Outlined below is guidance on the upload, editing and deleting processes in Manage Your Collections (MYC). If after reading this guidance you still can’t find the answer to your question, please email us with your query.
We have a webinar recording available on our YouTube channel that gives a practical demo of the upload and editing process.
Upload
What can I upload to Discovery?
You can upload spreadsheets as either .xlsx or .tsv files to Manage Your Collections. This file can be either the MYC template or your own spreadsheets with the fields mapped to Discovery’s.
Uploading with the MYC template
MYC template
The MYC Excel template is ISAD(G) compliant. It has 24 fields but only six are required fields at the fonds level:
- Level of Description
- Title
- Name of Creator
- Scope and Content
- Dates
- Reference Code
At the levels below fonds, there are four required fields:
- Level of Description
- Reference Code
- Title
- Dates
Step one – get the template
Sign in to your Manage Your Collections account and go to the ‘Add a collection’ page where you will be able to upload new catalogue data to Discovery.
Click on ‘template’ and save the blank template to your computer. Then fill in your own catalogue data. Do not delete or hide any columns or fields.
(Please note: we use columns A and B of each template for our own administrative purposes. These columns are hidden when you download a blank template: column C will be the first column in your template).
When you have finished adding data to the template, save it on your computer.
Step two – upload the file
Click on ‘Upload file’. Select the file you wish to upload by clicking on ‘Choose a file’ in the window that appears. Find the file on your computer, and select it. Then click the ‘Open’ button.
Click on ‘Upload’.
Step three – preview and approve
Once the file has uploaded, you’ll be directed to ‘View History’. Once your data has been validated, you will see the ‘Preview and approve’ button. Click on this button to see the catalogue data that you have uploaded. This allows you to see a sample record of the collection on Discovery.
On the preview page, click ‘Approve’ or ‘Reject’ as appropriate. If you approve the collection, the collection will also appear in the ‘Find a Collection’ section.
For further information on validation see the ‘Upload failed’ section below.
Some things to note
- You can either provide a start date and end date or covering dates for a collection. If providing start and end dates these need to be integers expressed as YYYY or YYYYMMDD. The covering date field is a free text field but this means that the dates will not be searchable. Only entries with start and end dates populated will appear in searches where users have selected a date range.
- A file will not validate if too many levels are skipped at once within the tree structure. For example, you cannot go from:
- Fonds to Item
- Series to Item
- However, you can go from Fonds to File
- Clicking on the column header cell will produce a yellow description box that offers help text for that field.
- Please note that although the help text in Manage Your Collections states Legal Status is a required field at the fonds level, it is optional.
- When formatting your catalogue data using Excel, you can type ALT-Enter or use the | symbol to signify the beginning of a new paragraph. Alternatively, you can use tags to indicate line breaks in your catalogue data. Permitted tags include <p>, <lb> and <ul> and <li> for lists. These are the only kinds of text formatting that are permitted in the template.
- Only one fonds per spreadsheet is allowed. If you want to upload multiple collections, they will need to be in separate spreadsheet files.
- We have some guidance on cataloguing archive collections that summarises the main points of archival cataloguing.
- You can include hyperlinks to your own online catalogue, website or digitsed content in your catalogue you upload to Discovery. You can include hyperlinks in the following fields; Scope and Content, Unpublished Finding Aids and Note. You must include “https://” or “https://” to the beginning of your URL to ensure the link will be live once it’s published to Discovery.
- If you experience an issue where your upload is not progressing past ‘Upload requested’ stage, after 60 mins a button will appear called ‘check status’. Click on this and the file will reprocess through to ‘Virus scanned’ and onto ‘Data validated’.
Uploading with the metadata mapper
The metadata mapper is another way to upload your collections to Discovery. It allows you to upload your own spreadsheets (either .xlsx or .tsv) and map your metadata fields to Discovery’s.
Mapping process
Once you have uploaded a file of catalogue data to Discovery, you can check the progress of your upload on the ‘View history’ page. Click on the message ‘Map fields in Discovery’ once it appears.
You can choose to create a new mapping, or reuse one that you have created previously. Select one of these options from the drop-down list on the ‘Map your fields to Discovery’ page, and then click on ‘Go’. If you are creating a new mapping, give it a name so it can be saved for future reuse.
Select a field from Discovery, and then select the field in your catalogue data that corresponds to it. (When you click on a Discovery field name, you will see a hint giving more detail about what this field is used for). Once you have selected two corresponding fields, click on ‘Match’.
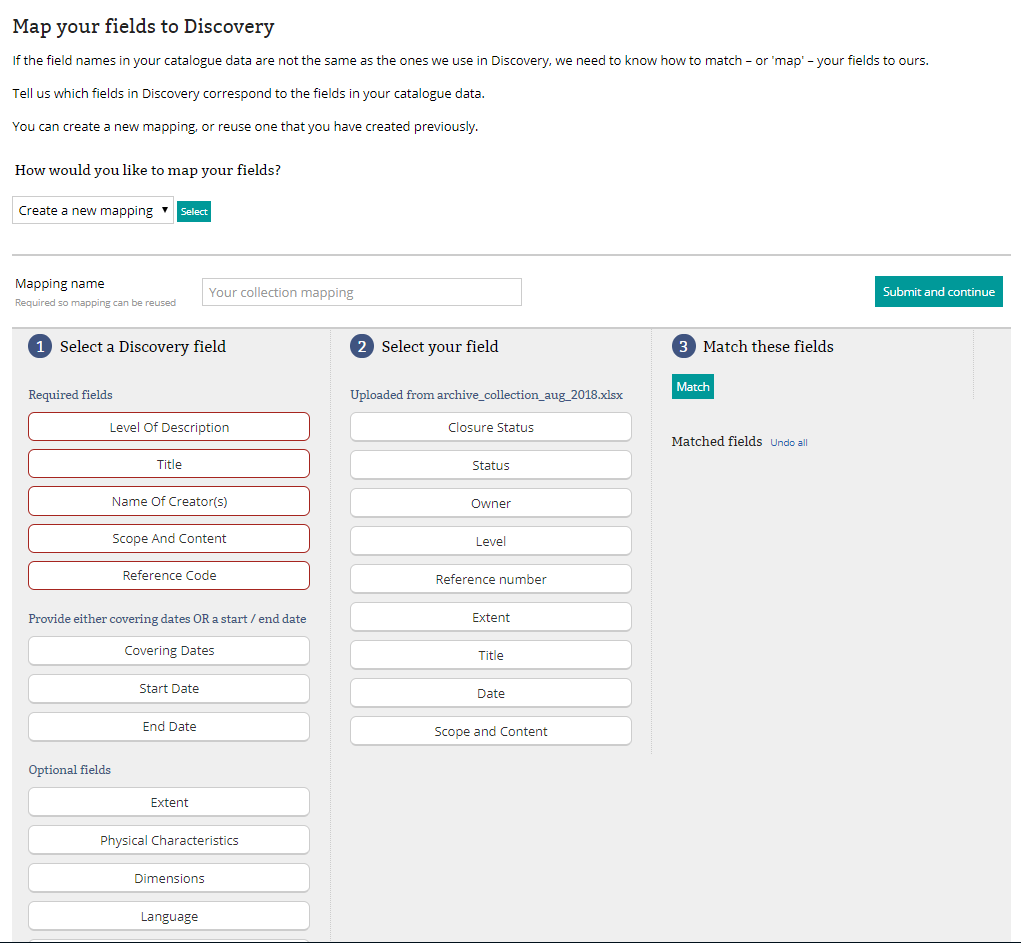
The metadata mapper on Manage Your Collections
If you wish to undo any field matching, click on ‘Undo’ next to the appropriate entry in your list of matched fields. The fields will be repopulated into their respective columns.
You do not need to map all the Discovery fields to fields in your catalogue data. Only match the ones that correspond to fields that you use. For a mapping to validate, there are five required fields to map and either start date and end date or covering dates.
Once you have matched all the fields in your list to fields in Discovery, give it a name, then click on ‘save this mapping and continue uploading data’.
Some things to note
- If you do save a mapping which you will want to re-use for other collections, ensure that you don’t change (move or rename) columns in the spreadsheet(s) you’re uploading as the saved mapping will not recognise the format. If you do upload a spreadsheet that is different from a saved mapping, you can simply create another mapping for it.
Metadata mapper and the Archives Hub template
The Archives Hub now offers a spreadsheet upload option and its template will work with the MYC metadata mapper. This will be useful for users who would like to use both Discovery and the Archives Hub. You will upload the Hub template and proceed with the mapping process as you would with any other file that isn’t the MYC template. There are just a couple of things to note if you will be using the Hub template to upload to Discovery;
- Please select ‘Fonds’ as the top level for your catalogue. Using ‘Collection’ will cause the file to fail validation.
- There are multiple fields in the Hub template for creators and subjects (including index names for persons, organisations, families and places). Discovery only has one field for each and the mapper only allows a one-to-one field match, so if you have multiple creators or subject/index names you would like included, these will need to be organised into one cell each respectively prior to upload.
Upload failed
If your catalogue data upload fails, you will see the ‘see error report’ button on the ‘View History’ page (it is also emailed to you). Click on this for the validation report, which shows the reason(s) why your data cannot be published in Discovery.
‘Error’ alerts must be resolved before your catalogue data will upload successfully to Discovery. The error report indicates the row number where the issue occurs, the column name and details of the problem identified.
Resolve the errors in the template. Once you have fixed all the errors, repeat the catalogue data upload process.
Editing
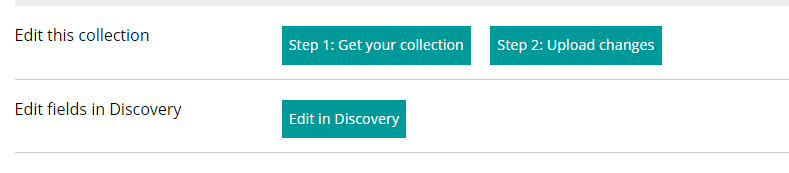
There are two ways to edit collection information – directly in Discovery or by downloading the collection in a spreadsheet, editing and then re-uploading the collection.
Editing in Discovery
Once you have signed in to your Manage Your Collections account, go to the ‘Find a collection’ page. Select or search for the collection you wish to edit.
Click on the ‘Edit fields in Discovery’ link to make changes.
Editing options in Manage Your Collections
You will be taken to the catalogue description page in Discovery, where you will find the ‘edit’ and ‘delete’ buttons are in the top right hand corner of the catalogue description. The ‘Mange your collections’ button will return you to your MYC account.
The edit, delete and home buttons in Discovery
In the ‘Record details’ page, edit or add information in each field as required. You can find help text for each field by clicking on the ‘?’ icon.
When your edits are complete, click on the ‘Publish changes’ button at the bottom of the page.
To return to your MYC account, click on ‘Manage your collections’.
Some things to note
You cannot edit the following fields in Discovery:
- Reference numbers. If you need to change the reference numbers for your collections, you will need to download the collection, edit the references in the spreadsheet and then re-upload.
- Fields that do not appear in the MYC template. A2A legacy collections can have different field names and consequently do not load in the ‘Record details’ page for editing. However, when you download the collection, fields are mapped to the corresponding MYC field name. For example, Related Material is a field commonly used in A2A collections. However, as this field name is not in the MYC template, any data in this field when downloaded is mapped to ‘Related Units of Description’.
Editing via exporting & re-uploading
You can make changes that are more extensive to a collection by downloading it into a spreadsheet, making the changes and then re-uploading to Discovery. This method can be used if you would like to add more content to your catalogue, such as addtional series or item level descriptions.
To download data about the collection from Discovery, click on the ‘Get your collection’ button. You will need to select whether you want to download your data in Excel format or EAD format.
Editing options in Manage Your Collections
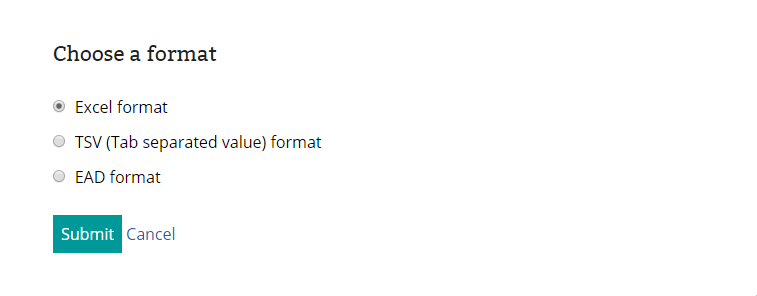
Format choices for data export on Manage Your Collections
Once you have selected your collection and the appropriate format, visit the ‘View history’ page. You will see which collections are ready for you to download. Click on the ‘Download collection’ link to retrieve your spreadsheet.
Edit the parts of the collection that you wish to change. Do not hide or delete any columns. If there are columns or fields in the template that are not relevant to your cataloguing schema, leave them empty.
Please note that we use columns A and B of the template for our own administrative purposes. These columns will be hidden when you download your collection information. However, if you are able to see details in columns headed ‘IAID’ and ‘PIAID’, do not edit this information. Making changes in these columns will make it impossible for Discovery to validate your catalogue data.
Once you have made the necessary changes, save the document to your computer. In the ‘Add a collection’ screen or the ‘Collection details’ screen, click the ‘Upload changes’ button. You will see the ‘Upload a file’ window: click ‘Choose a file’ and select the file from the location where you have saved it.
Click the ‘Upload’ button.
Some things to note
If you want to edit legacy A2A collections by downloading them, it is likely they will not have all the information necessary for the template to validate on re-upload. If you do download a legacy A2A collection, as well as making the changes you wish to, ensure you check the following:
- That there is a start and end date or covering dates for each record and that the dates are formatted correctly in the start and end date column expressed as YYYY or YYYYMMDD. Covering dates is a free text field.
- Creator information is filled out at fonds level.
Deleting Collections
Go to the ‘Find a collection’ page. Select or search for the collection you wish to delete.
Once you have selected the collection you wish to delete you will see the ‘Delete this collection’ button: click on it.
Select your reason for deletion in the drop-down menu in the window that appears and select ‘Confirm’.
You should now be able to see the collection awaiting deletion on the ‘View history’ page.
You will have seven days to change your mind before your collection is permanently deleted. To prevent its deletion, visit the ‘View history’ page and click on the appropriate ‘Restore’ button.